Ma.K Lunadiver Stingray Scale Model Paint Tutorial with Lincoln Wright
Hey guys, first video of the year and yep, I’m getting it all wrong again!
Hand brush AND Airbrush Mr Color COMBINED to recover from epic spray can fail. Here's how I painted my Maschinen Krieger Lunadiver Stingray scale model kit!
Here are the details for the 2022 Ma.K Comp https://bit.ly/MaKcomp2022
I’d like to thank my supporters on Patreon for paying me to film myself ruining this Plastic Space Stingray. If you’d like to support the channel and get access to bonus videos then visit; https://www.patreon.com/paintonplastic
Thanks for watching,
Linc


If you’d prefer to read the script in your own voice or you just like reading stuff quickly like I do, here’s the script for you;
Lunadiver Paint Video Script
Hey guys, here’s how I’ve painted up my Lunadiver Stingray so far. It’s funny, isn’t it? How our plans are never quite what happens? In a typical plastic modelling saga, I wanted to do this in old school Ma.K style with the cans and big paintbrushes but we got really lucky and a variable nudged its way in - my spray cans ran out at the worst possible timing!
Well, that’s what I would have thought until I learned that making great finishes is all about that recovery.
Let me share with you how I recovered and ended up with a much more interesting finish because of it. Just before we kick-off, I’d like to update you on the amazing judging panel I’ve assembled for our Ma.K 2022 contest, Kow Yokoyama Sensei, the property creator, Max Watanabe Sensei, the legendary modeller and Japan Sensei and humbly myself, I’ll be joining and assisting them. Link to more details on my website in the description. Please join us and I hope this is exciting for you too.
The Build
The Lunadiver build is one of the trickier ones in the Ma.K lineup from Hasegawa but don’t let it put you off. Just need to improve our skills with curved seam lines and that will help you on all your projects going forward. Just 2 little mods, I replaced 2 of these grab handles with brass because they are actually proud if you place the kit down upsidedown and added a brass rod for the little tank here. Yes, you can build the kit with 1, 2 or none but the most common is to build with just one and it’s to visually offset the large radar dish.
The Paint
Great day outside here and I’m feeling all nostalgic so straight into a spray can start. I painted up a full studio size resin kit of the Lunadiver in 1/20 scale and did not own an airbrush at the time so Kow Yokoyama Sensei simply suggested, “Use cans!”. He was right again!
Grey Primer
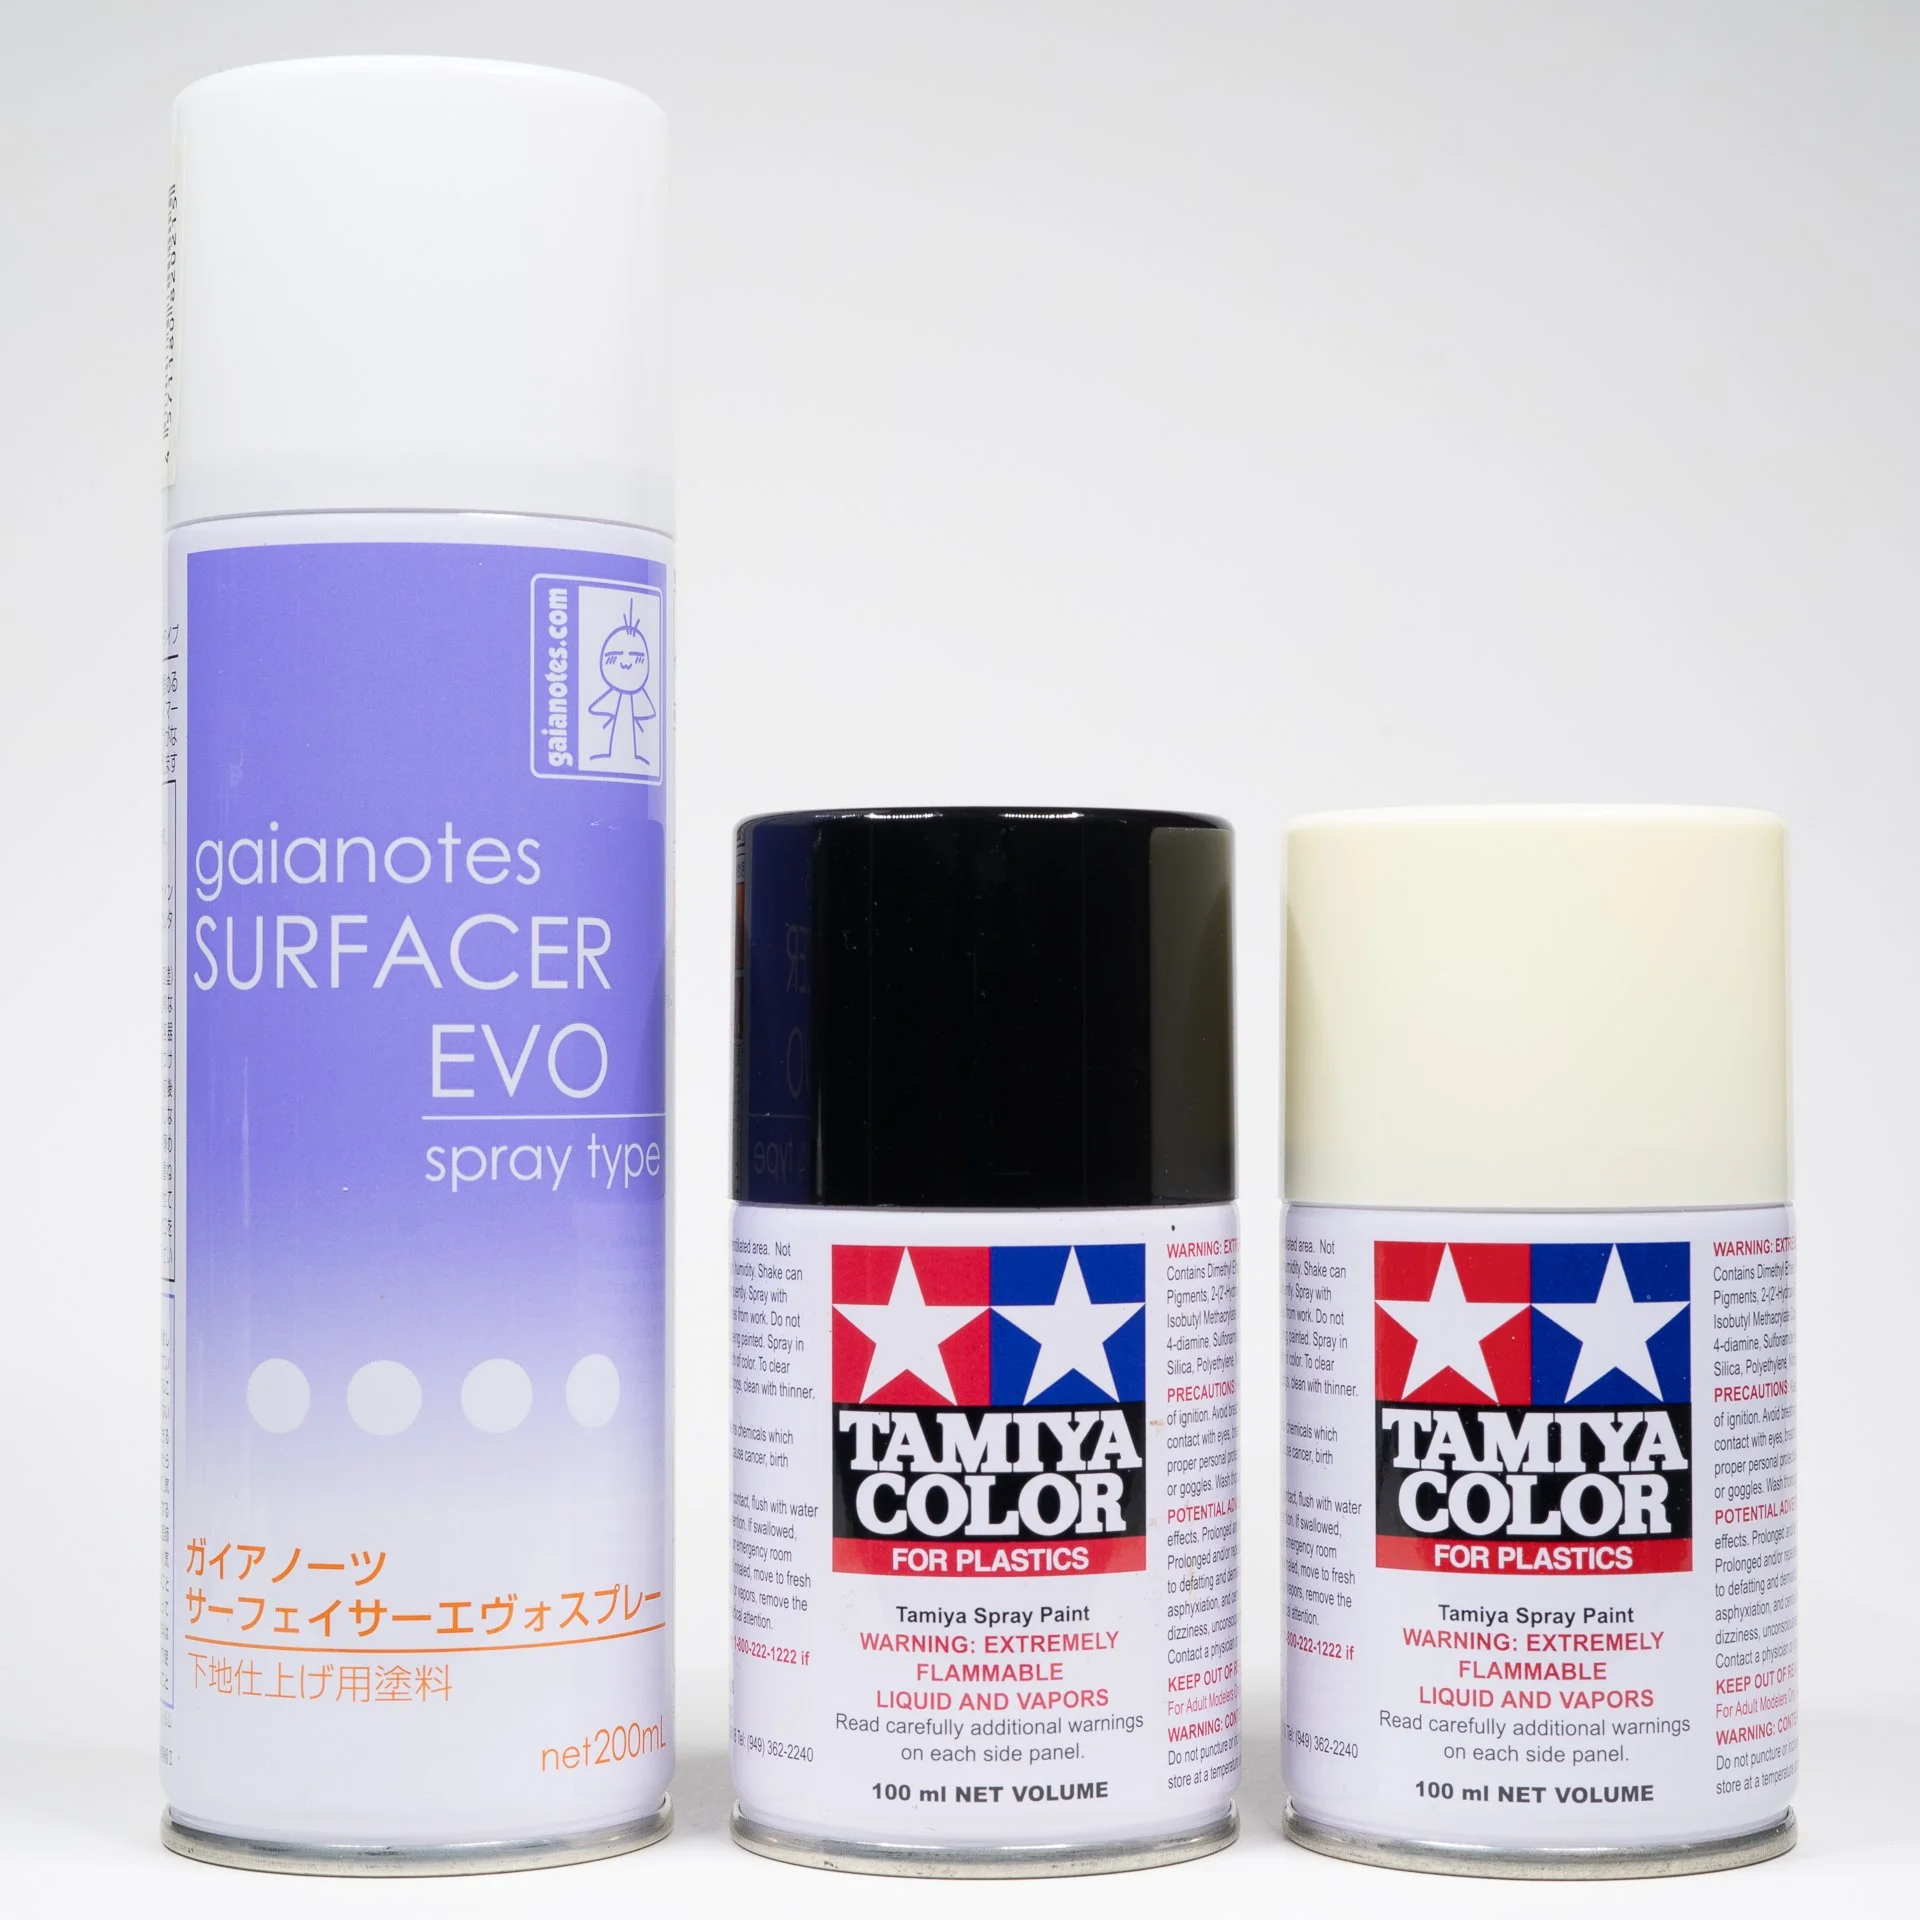
Let’s make sure the kit is nice, smooth and free enough of seamlines. A great way to check this and prepare the base for painting is to use a Surfacer and this time I went with Gaianotes EVO Grey - this one on the left. Plenty of other good ones to use here if you don’t have this one and yes, of course, you can also airbrush on a suitable version as well.
Short bursts, keep the can moving and don’t let the paint pool. As we are building and cleaning up the kit, we know here the rough spots are and this is a good way to make extra sure we are good.
See how the Lunadiver comes with a handle? Yes, I spray the main body and then tail boom separately and wear a glove.
Plus even though I am outside I am still wearing a respirator mask with organic solvent filters. I will admit that I did hold my breath out on my Tokyo balcony but it was ALWAYS windy up on the 13th floor. It’s pretty calm down here so I mask up for safety.
Sub assemblies are sprayed on their sticks, nice and handy and yes, you MUST also be using a homemade weebie holder just like me. Haha, this is from a kit our daughter made and my lovely wife made this up as a custom stand for fun and thought it was hilarious that I included it in my FAQ book instead of the store-bought versions.
All the kit parts resplendent in grey primer and they check out ok.
Gloss Black Base
Let’s lay down a full, perfect coat of a dark base to work upwards from, in this case, I am using Tamiya TS-14 Black Gloss.
The reason I like using black gloss for this step is that it’s the purest form of paint, it doesn’t have additives such as flattening agents and allows us to keep the layer relatively thin for how wonderfully opaque it is. Plus I just love how shiny it looks at this stage!
No, we don’t have to use Black Gloss and now with shortages of paints quite common due to the pandemic, I’ve also purchased a Tamiya Black Mettalic as a back up for example. Yes of course, we could also use a Flat Black like trusty old Chaos Black from Citadel. So much nostalgia for that paint… just not for the price…
Please understand that I am just showing you examples here, I don’t ever feel there is one “best” choice. It’s more of how we compile all of our choices to make our finish and it’s fun to compare and experiment! Plus it can be pure logistics, what’s available to us at our local store or online.
You’ll see that I’ve given the main body a generous coat and it’s fascinating to me how different it looks in going from grey to gloss black. You’ll find that gloss black covers well but it’s difficult to see it pooling so be diligent and watch your surface carefully. Please don’t imagine that with my working speed I am just leaning back and hosing it on, I am super careful and laser beam focussed when using cans, way more than when I am airbrushing. The speed and volume of paint can get a novice into trouble very quickly so please err on the side of caution and under spray rather than overdo it.
Happy accident number one, it was when I was spraying these sub-assemblies that the Black Gloss can ran out. Quite cleanly too I may add so I simply put the remaining parts into my airbrush spray booth and moved along with the Gloss Off White Spray.
Gloss Off White Color Coat
If you’ve been watching my videos over the past few years, thank you VERY much for that and especially for subscribing, you might have seen me use this exact can a bunch of times. Yes, it’s the same can of TS-7 Racing White. I’ve only had one and yep, brought this from Japan with me. I’m all sad and lonely now!
It’s a great can of Off White Gloss for your paint works, I highly recommend it but sadly, I knew this would be the last model to use it on. It was feeling very light in the can and started to sputter quite early on in the session. I wondered if I should back off and show you something else but no, this is a perfect opportunity to share how I will recover from this… Well, IF I can recover I thought but I remember doing it in the past… I mean, I kind of remember…. I think I just painted it out with a brush but they were the good old Tokyo days when another can was just 10 minutes down the road for cheap. Oh how I was RUINED by this availability but it’s also made me a better modeller for it. Well, that’s how I cry myself to sleep on my big soggy pillow these days…
Different technique here as the paint is MUCH less opaque than Gloss Black and requires a couple of finer coats to build up a decent amount of white. Wait, couldn’t you just have gone straight over the grey primer Linc? Yes, we can do that and I think I showed you that one in the Ghostkeel video. Couldn’t we also use a white primer and then go with this Off-White. Yep, again we could totally do that too. The finishes will be very different though and they simply won’t have that depth of shadow look and apparent weight that spraying white over black produces. Have a really good look at my WIP shots or test it out yourself and you will see what I mean. No, it’s not best but it’s a particular look and that’s what I am going for here.
Look closely and you can see what I mean, first the “Racing White” goes on as a kind of grey over the black. Then with more paint, it becomes a dull white and then as more thickness and opacity is achieved, we have some of that very pale yellow eggshell becoming apparent. This is why I am such a fan of this paint, it’s very translucent and a bit of pain to build up but produces wonderful variation and tonal qualities that I find very attractive in a “Space White” finish, perfect for classic Maschinen Kriger like this.
Now, this next technique is pretty subtle, as the can is clearly running out of paint now and is more and more inconsistent and spluttery, I am extending it out with broad stroke sprays across surfaces for maximum coverage and to produce a really cool “ground” or base effect. The gas is running out too so sometimes the paint is quite thick so it’s better to give it plenty of surface to stretch across.
The artefacts and effects it produces are priceless. It’s a very hot primer so when there is enough thickness of paint, it starts melting down into the gloss black layer which then bubbles up to the top. It’s absolutely brilliant and magical to me, these amazing effects are so difficult to achieve at any other time but here at the end of the can’s useful life, it’s spewing out priceless gems!
Now I get it, this is not the way for everyone and I might even be scaring some of you off trying it but please, it’s just a plastic model and we can always work some of these steps back and recover and finish them. Be brave, be bold and create magic. We can always go back to a predictable and safe finish next time. This end of useful life spray can is a gift of opportunity and with the risk to do something really cool! Let’s make the most of it!
Airbrush Gloss Black
See, here’s the safety catch up. If you hated my work with the cans and that level of crazy is not right for you, don’t despair, ol’ Uncle Linc does safety painting steps too. Airbrushing is perfect for a predictable and safe way of painting as we can control everything.
Our paint mix, the amount of air, our distance to the surface and how quickly we move the brush. It’s actually really easy to do too, I find airbrushing to be super intuitive. You just need to watch what is happening and adjust on the fly.
Plus, after the out of control train wreck feeling of the spray cans this time, I really enjoyed the airbrushing steps and they felt soothing and pleasant. Plus I think they also work to nicely blend in the visceral harshness of the dying white spray can.
To keep it nice and matched up to the main sections, I am using a pretty average base coat mix of Mr Color 02 Black Gloss, maybe 2 thirds self-levelling thinner to one-third paint and shooting at a pretty standard 20psi.
To confess, as I am matching this up with can work, I’m just leaning on the trigger and hosing this on for even wet coats. Mr Color is such a beautiful airbrushing paint and so forgiving, just get a decent opaque coat and move on but same warning as per the can version, the glossy black can be deceptive and hide where it is pooling so do please keep an eye on your thickness here but it can be done nicely and quickly.
Airbrush Gloss “Space White”
Eyeballing my mix here because Ma.K “Space White” is not such a fixed concept and there’s plenty of wiggle room, I’ve added a mixer dip worth of the wrong yellow into Mr Color 69 Off-White and all good. My “wrong yellow is Mr Color RLM Yellow and is a fine yellow and just what was available at the time. But what we would write on the box sample, it’s supposed to be Mr Color 04 Yellow. I promise I will use the correct mix sometime in the future and let’s see if we can notice the difference.
I’ve tried to approximate the can coverage but a little better, still leaving some shadow coming through. Yes, it’s a kind of pre-shade but not the textbook kind. You should see what I mean as we move along.
Masking the ID Bands
Masking the ID bands, I need a little help with at least a guideline to paint stuff like this in and I figure there's 2 ways to go. If you prefer proper masking, then mask off and airbrush - as a confession, I did this with the rail gun and extra tank because fast and easy however I do think it kind of shrinks the model in a little because of the perfection of the lines. Please don’t notice them!
For these main sections on the hull, I’ve gone old school studio and used the masks as a template to pencil in the outline. This is more like prop painting and I highly recommend trying it out as this gives me bags of confidence with brush painting and not always needing to rely on masking. It feels like a super skill!!
Using Tamiya 10mm tape, any low tack tape will be fine, I’ve marked out a large band on both the front and tail of the Stringray. The paint card makes it look easy, across the top and bottom like this and straight down the sides like this but yeah narrrr m8. The complex shape and curves that become apparent when you build the model are anything but “straight” and you’ll need to eyeball it into a pleasing line around the model that the tape will tell you is anything BUY straight. Wonderfully satisfying, yes, but straight? NOPE!
Once I have it about right, I’m using a soft B graphite pencil to sketch in the lines. The best thing about the glossy racing white paint is that mistakes rub off with your finger so go nuts, you’ve got this!
In full confession mode, there were a couple of corners and even the backside of the tail where I just eyeballed and freehanded it in. I feel confident enough to not ruin it these days but still use tape for the trickier parts.
Hand brushing the ID Bands
Ok, finally to show you something that has a modicum of skill, hand brushing in the ID bands. Now, of course, you can totally just mask and spray these and yes it will be faster. I am in no way trying to make out this is some kind of better way for process and I know the truth, many of my friends just don’t ever want to do this. That’s more than fine and we are still totally buddies. All good. As mentioned, I did mask off and spray the rail gun and tank and am happy with how they look plus with the wet airbrush coat they are nice and glossy.
I want to do this and think it looks cool. Yep, that’s really it! For me, there’s something about these old school techniques that make a model look a certain way and I fell in love with the visceral harshness of it when viewed in real life up close. I am sorry that I can’t always give you that experience and this is probably as close as you may come to it.
The classic Ma.K “red” is in fact Mr Color 7 “Brown”. It’s a dark red and quite a useful color, you may have seen me use this as part of my base colors for Desert Pink as well.
I have a collection of these little dishes and Mr Color Brown has its own dish and I just top it up a little with properly mixed paint, add in some Self Levelling Thinner and it reactivates and mixes up. The dish shape is great because we find the thicker paint rests towards the bottom and we can use the sides to work with the thinner paint. It’s like some sort of old school wet palette just with less steps and is it’s its own kind of simplistic beauty if you see what I mean? It’s very Japanese in the application, as with their history of watercolor painting.
I prepared 2 brushes to show you this and ended up only using the first choice. A size 4 flat synthetic brush. It’s not so much about the brush as much as how you use it.
The process is extremely satisfying and calming, no rush and just take your time. It’s also a very direct connection method as we are physically touching the model with the brush.
Before I start, I like to plan what vectors I might like to have in the finish. The brushstrokes that remain are a feature, not a bug. For the Lunadiver Stingray, I want horizontal streak vectors across the top and bottom with vertical vectors on the tail and sides. There are a few places where these rules need to be curved and we can eyeball them into place. Please also note that this is not the only step to make use of these paint vectors, I will call them out as I reinforce them in subsequent steps for you.
Simply put, I am painting either away from my sketch outline or back up to it. It’s not a hard rule, comfort or in my case, camera angle helps to let you know which way feels best. If it’s awkward and uncomfortable, try changing it up a little bit over time, you will be amazed at how weird angles become more comfortable. For me, it’s the weird “for the camera” shots where I need to freehand a straight line that is most challenging but I appreciate the challenge and have probably improved because of it. I want to believe!!
This color combo is quite forgiving, the brown has great coverage and we actually want a little of the white to come through plus being a full gloss paint, you have noticed that I am working with it quite thick. It’s thinned 50% or less. It seems to me that full gloss paints have better self-levelling properties than semi-gloss and flat paints. I might be wrong and it could be a cognitive bias but if we believe it, George Costanza tells me it’s not a lie.
Airbrush Space White Clean Up
No idea what to call this step so I am just going to obvious it for you. “Airbrush Space White Clean Up.” It may seem sometimes that I like paintbrushes more than airbrushes but not at all, I love tools for what they are really good at and here is one of the ways I feel that airbrushes are amazing. For softening and blending harsher paint applications.
Yes I had considered using a paintbrush to show you how I would re-work some of the artefacts and paint blotches from the spray can but as mentioned, I was just using the airbrush to lay down the space white on the rail gun, one side shield and little extra tank. So it makes perfect sense to roll on, you’ve got the paint loaded and ready to go and make it happen.
Rather than just hose it on, which I’ll admit I was tempted to do because it’s fun, I carefully examined each piece and decided where to thicken up the white, were to leave and how much. A very careful airbrush step.
Plus I had this little epiphany in the moment, I will admit it was not planned and I’ve never done it before. I have 2 paint cards for the 2 releases of the Lunadiver in this paint scheme and you can see that they both feature a post shading overspray, albeit rendered in 2D artwork form. I know this for 2 reasons, first because I know it’s a favourite technique used by Kow Yokoyama Sensei and second because as we’ve talked about, I’ve worked on these paint cards in the past.
I will demo that for you in the weathering video up next, so please make sure to subscribe so you don’t miss that one.
This was in the back of my mind and the idea, “hey why don’t you do a little of that step now, with the white. Could be cool!” So yeah, that happened and I carefully experimented with adding a kind of self stripe, freehanded into the white in the same vector pattern as described before with the brown.
Is it a win? Not sure but I like it and it was fun. That’s good enough for me and I might try it again. Check out the photos in the gallery for a closer look.
Weathering up next!
Linc


Welcome to Part 2 of my MASKENBALL Weathering Masterclass—the ultimate guide to advanced scale modeling weathering techniques for Maschinen Krieger (Ma.K) builds!!